Setup database & spring boot application
Before we start with Random-JPA, we need to simulate an application. I will be creating a simple spring boot application using MySql as my database for this purpose.
If you want to skip, download the latest code zip and proceed to the next tutorial.
Next task is to setup our spring project, we will create a maven project with the given pom dependencies
<?xml version="1.0" encoding="UTF-8"?>
<project xmlns="http://maven.apache.org/POM/4.0.0" xmlns:xsi="http://www.w3.org/2001/XMLSchema-instance"
         xsi:schemaLocation="http://maven.apache.org/POM/4.0.0 http://maven.apache.org/xsd/maven-4.0.0.xsd">
    <modelVersion>4.0.0</modelVersion>
    <parent>
        <groupId>org.springframework.boot</groupId>
        <artifactId>spring-boot-starter-parent</artifactId>
        <version>2.1.1.RELEASE</version>
        <relativePath/> <!-- lookup parent from repository -->
    </parent>
    <groupId>in.kuros.randomjpa</groupId>
    <artifactId>blog-example</artifactId>
    <version>0.0.1-SNAPSHOT</version>
    <name>blog-example</name>
    <description>Demo project for Random-JPA</description>

    <properties>
        <java.version>1.8</java.version>
    </properties>

    <dependencies>
        <dependency>
            <groupId>org.springframework.boot</groupId>
            <artifactId>spring-boot-starter-data-jpa</artifactId>
        </dependency>
        <dependency>
            <groupId>org.springframework.boot</groupId>
            <artifactId>spring-boot-starter-data-rest</artifactId>
        </dependency>

        <dependency>
            <groupId>mysql</groupId>
            <artifactId>mysql-connector-java</artifactId>
            <scope>runtime</scope>
        </dependency>
        <dependency>
            <groupId>org.springframework.boot</groupId>
            <artifactId>spring-boot-starter-test</artifactId>
            <scope>test</scope>
        </dependency>
    </dependencies>

    <build>
        <plugins>
            <plugin>
                <groupId>org.springframework.boot</groupId>
                <artifactId>spring-boot-maven-plugin</artifactId>
            </plugin>
        </plugins>
    </build>

</project>
Create a spring boot application
package in.kuros.randomjpa.blogexample;

import org.springframework.boot.SpringApplication;
import org.springframework.boot.autoconfigure.SpringBootApplication;

@SpringBootApplication
public class BlogExampleApplication {

    public static void main(final String[] args) {
        SpringApplication.run(BlogExampleApplication.class, args);
    }

}
Next step is to configure spring boot with mysql datasource. Create a application.properties in your resources folder
spring.datasource.url=jdbc:mysql://localhost:3306/employees
spring.datasource.username=root
spring.datasource.password=passwd
Let us create employee table in MySql:
CREATE DATBASE employees;
USE employees;

CREATE TABLE employee (
                         emp_no      INT             NOT NULL AUTO_INCREMENT,
                         birth_date  DATE            NOT NULL,
                         first_name  VARCHAR(14)     NOT NULL,
                         last_name   VARCHAR(16)     NOT NULL,
                         gender      ENUM ('M','F')  NOT NULL,
                         hire_date   DATE            NOT NULL,
                         PRIMARY KEY (emp_no)
);
Let’s respective entity class in our application:
@Entity
@Table(name = "employee")
public class Employee {

    @Id
    @Column(name = "emp_no")
    @GeneratedValue(strategy = GenerationType.IDENTITY)
    private Integer empNo;

    @Basic
    @Column(name = "birth_date")
    private LocalDate birthDate;

    @Basic
    @Column(name = "first_name")
    private String firstName;

    @Basic
    @Column(name = "last_name")
    private String lastName;

    @Basic
    @Column(name = "gender")
    @Convert(converter = Gender.GenderConverter.class)
    private Gender gender;

    @Basic
    @Column(name = "hire_date")
    private LocalDate hireDate;

    // Getters & Setters ...
}
Create Employee Repository
Next step is to add a repository to access data, for now we will just add repository for Employee
Creating spring data repository for entity is very easy, you just need to extend Repository interface. Here we are using PagingAndSortingRepository, you just need to specify Entity and Id type and you are done.
public interface EmployeeRepository extends PagingAndSortingRepository<Employees, Integer> {
}
Next we want to expose the data through rest endpoint, so will will user spring-data-rest here by adding @RepositoryRestResource annotation to our repository. so our repository looks like
package in.kuros.randomjpa.blogexample.repository;

import in.kuros.randomjpa.blogexample.entity.Employees;
import org.springframework.data.repository.PagingAndSortingRepository;
import org.springframework.data.rest.core.annotation.RepositoryRestResource;

@RepositoryRestResource(collectionResourceRel = "employee", path = "employee")
public interface EmployeeRepository extends PagingAndSortingRepository<Employees, Integer> {
}
Your base application is ready to serve data, just start the application and hit the endpoint
http://localhost:8080/employee
you will get this response on your browser
{
  "_embedded" : {
    "employee" : [ {
      "birthDate" : "1953-09-02",
      "firstName" : "Georgi",
      "lastName" : "Facello",
      "gender" : null,
      "hireDate" : "1986-06-26",
      "_links" : {
        "self" : {
          "href" : "http://localhost:8080/employee/10001"
        },
        "employees" : {
          "href" : "http://localhost:8080/employee/10001"
        }
      }
    }, {
      "birthDate" : "1964-06-02",
      "firstName" : "Bezalel",
      "lastName" : "Simmel",
      "gender" : null,
      "hireDate" : "1985-11-21",
      "_links" : {
        "self" : {
          "href" : "http://localhost:8080/employee/10002"
        },
        "employees" : {
          "href" : "http://localhost:8080/employee/10002"
        }
      }
    } ]
  },
  "_links" : {
    "first" : {
      "href" : "http://localhost:8080/employee?page=0&size=2"
    },
    "self" : {
      "href" : "http://localhost:8080/employee{&sort}",
      "templated" : true
    },
    "next" : {
      "href" : "http://localhost:8080/employee?page=1&size=2"
    },
    "last" : {
      "href" : "http://localhost:8080/employee?page=7&size=2"
    },
    "profile" : {
      "href" : "http://localhost:8080/profile/employee"
    }
  },
  "page" : {
    "size" : 2,
    "totalElements" : 15,
    "totalPages" : 8,
    "number" : 0
  }
}
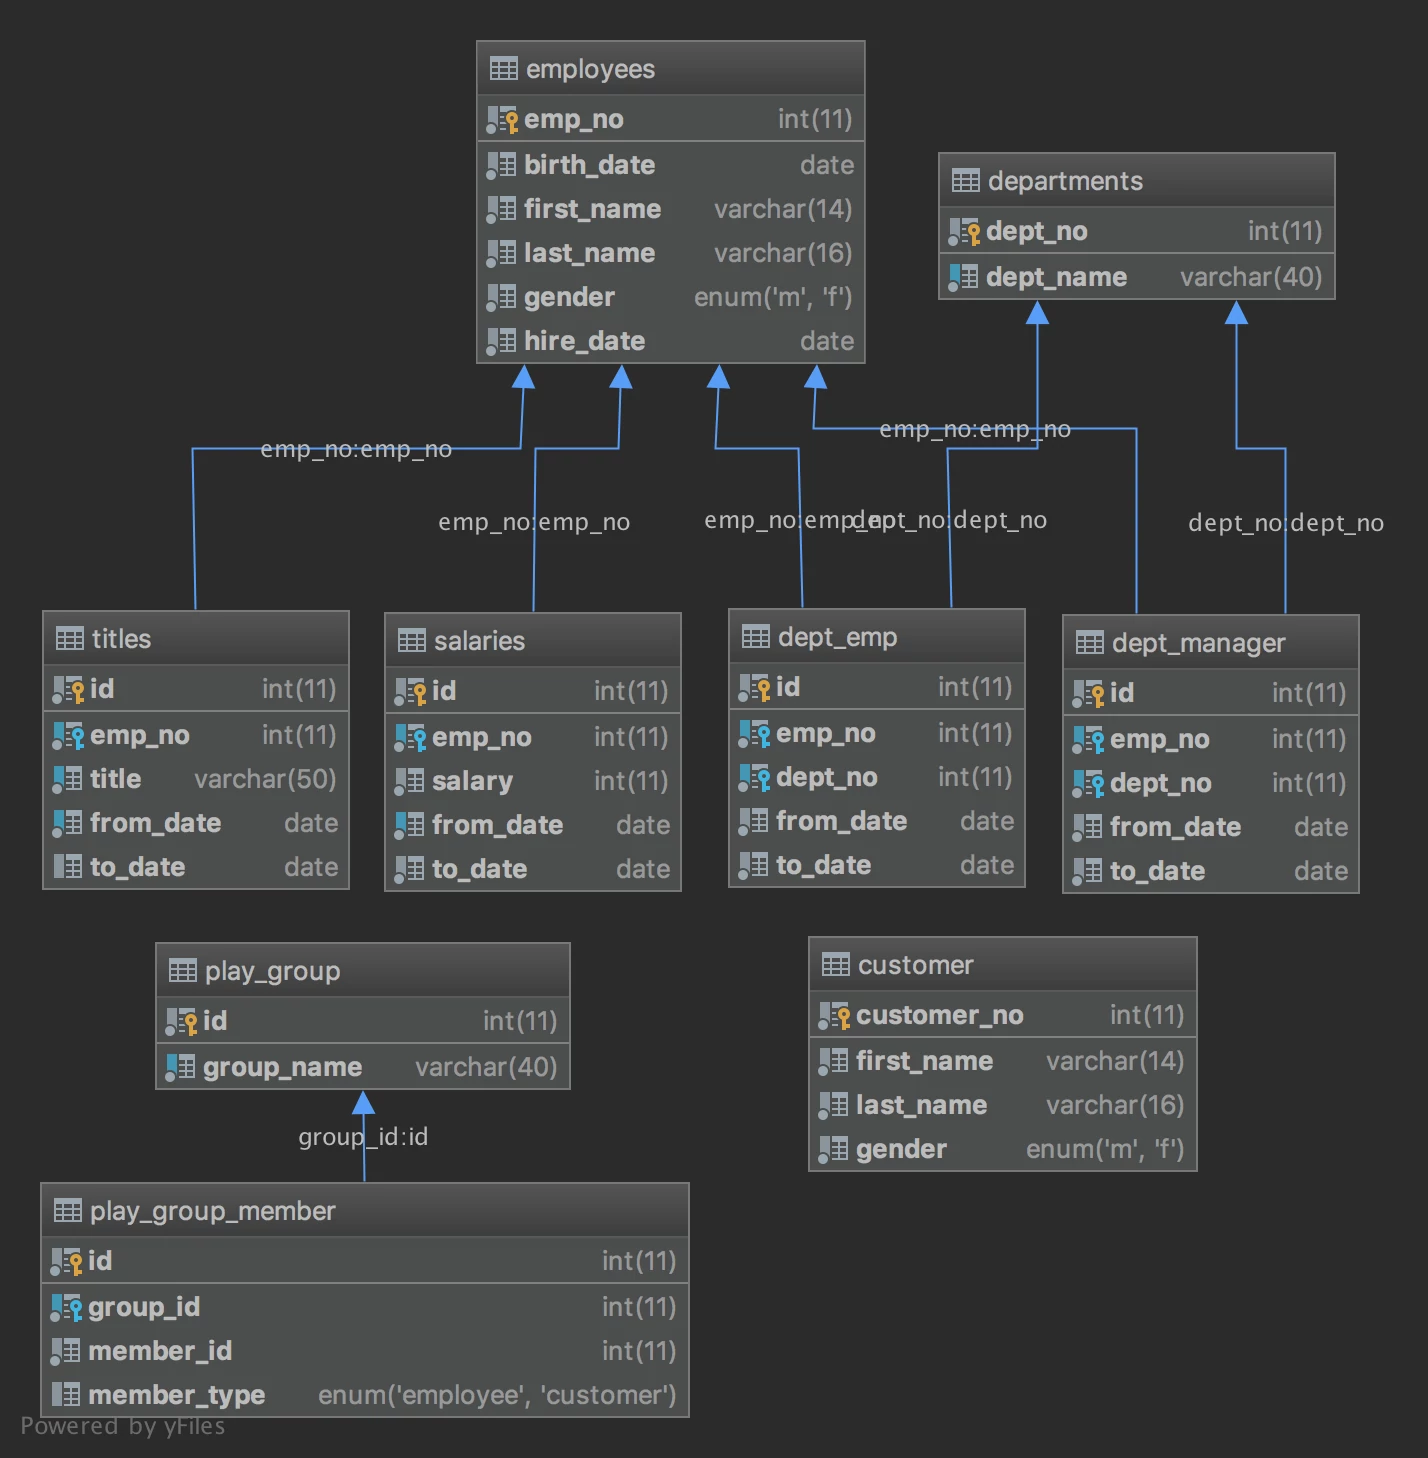
Sample Database Schema
The MySQL sample database schema consists of the following tables:
- Employees: stores employee’s data.
- Departments: stores department details.
- dept_manager: store manager of each department.
- dept_emp: store employees under each department.
- titles: store the titles of each employee.
- salaries: store the salaries of each employee.
- customer: store customer’s data.
- play_group: store the list of play groups. (both employee & external customers can join the group).
- play_group_member: store the list of member for each group.
Download base application
Till now we have only added entity mapping.
We have a total of 15 employees in this database. So this request give two employee details with links to fetch rest of records under _link
Congrats you have your first app running.
Now as have a base application to work with, we can proceed with exploring random-JPA.
If you liked this article, you can buy me a coffee
Leave a comment