Running First Kubernetes Pod on Mac (Windows)
All you need is 60 minutes to run your first application in Kubernetes, in this post we will install docker with kubernetes on our local machine, create a simple app and its docker image and finally deploy it on our kubernetes cluster.
Note: The minimum docker desktop version required for kubernetes is 18.09.1
Installing Docker Desktop
First thing first, we need to install Docker Desktop, download the latest version
Installation of docker is easy, I will installing docker on Mac (for Windows, process is similar). Please follow the instruction provided on site and download the installer.
Install it
Double-click Docker.dmg to start the install process.
When the installation completes and Docker starts, the whale in the top status bar shows that Docker is running, and accessible from a terminal.

Verify
Open command line terminal, and try if docker is installed.
$ docker version
Client: Docker Engine - Community
 Version:           18.09.1
 API version:       1.39
 Go version:        go1.10.6
 Git commit:        4c52b90
 Built:             Wed Jan  9 19:33:12 2019
 OS/Arch:           darwin/amd64
 Experimental:      false

Server: Docker Engine - Community
 Engine:
  Version:          18.09.1
  API version:      1.39 (minimum version 1.12)
  Go version:       go1.10.6
  Git commit:       4c52b90
  Built:            Wed Jan  9 19:41:49 2019
  OS/Arch:          linux/amd64
  Experimental:     true
Enable Kubernetes
Open Docker preferences/settings, go to Kubernetes tab(only available after version 18.09.1) & enable it.
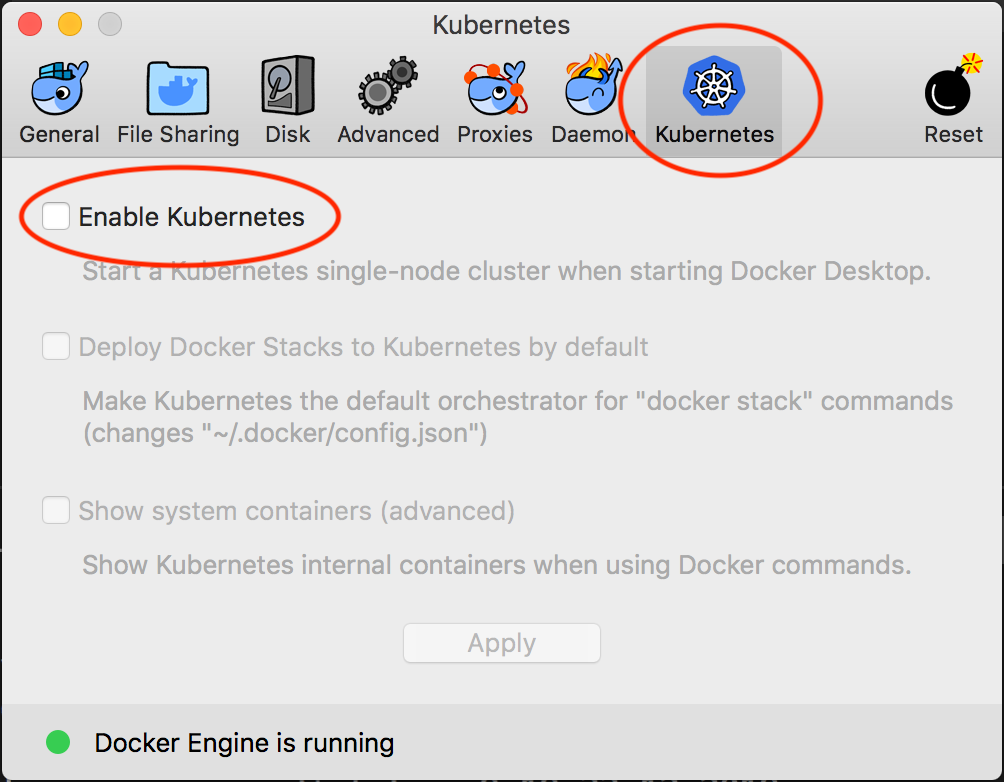
Once the Kubernetes is started, you will see green indicator for both k8s & docker.
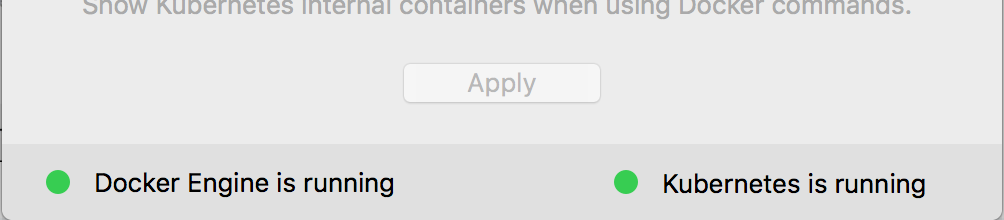
Congratulations !!! you have a single node cluster ready.
Exploring the cluster
Docker Desktop also install kubectl at location /usr/local/bin/kubectl, we will verify that we have a running node.
Use the below command get the running nodes
$ kubectl get nodes
NAME                 STATUS   ROLES    AGE   VERSION
docker-for-desktop   Ready    master   12m   v1.10.11
We will check for running services
$ kubectl get services
NAME         TYPE        CLUSTER-IP   EXTERNAL-IP   PORT(S)   AGE
kubernetes   ClusterIP   10.96.0.1    <none>        443/TCP   12m
We can also verify cluster information
$ kubectl cluster-info
Kubernetes master is running at https://localhost:6443
KubeDNS is running at https://localhost:6443/api/v1/namespaces/kube-system/services/kube-dns:dns/proxy

To further debug and diagnose cluster problems, use 'kubectl cluster-info dump'.
But when we try access the url in browser, we get an authentication failure.
https://localhost:6443/api/v1/namespaces/kube-system/services/kube-dns:dns/proxy
{
  "kind": "Status",
  "apiVersion": "v1",
  "metadata": {},
  "status": "Failure",
  "message": "services \"kube-dns:dns\" is forbidden: User \"system:anonymous\" cannot get services/proxy in the namespace \"kube-system\"",
  "reason": "Forbidden",
  "details": {
    "name": "kube-dns:dns",
    "kind": "services"
  },
  "code": 403
}
It looks like we’re being blocked by the cluster’s RBAC policies. The system:anonymous user is being prevented from listing the namespaces in the cluster.
We need to create a clusterrolebinding that adds the system:anonymous user to the cluster-admin role.
$ kubectl create clusterrolebinding cluster-system-anonymous --clusterrole=cluster-admin --user=system:anonymous
Now if you will access
https://localhost:6443/api/v1/namespaces/kube-system/services/kube-dns:dns/proxy
You will get response something like this, it gives all the details related to the running service
{
  "kind": "Service",
  "apiVersion": "v1",
  "metadata": {
    "name": "kube-dns",
    "namespace": "kube-system",
    "selfLink": "/api/v1/namespaces/kube-system/services/kube-dns",
    "uid": "c25ab536-2b7a-11e9-a713-025000000001",
    "resourceVersion": "175",
    "creationTimestamp": "2019-02-08T08:23:05Z",
    "labels": {
      "k8s-app": "kube-dns",
      "kubernetes.io/cluster-service": "true",
      "kubernetes.io/name": "KubeDNS"
    }
  },
  "spec": {
    "ports": [
      {
        "name": "dns",
        "protocol": "UDP",
        "port": 53,
        "targetPort": 53
      },
      {
        "name": "dns-tcp",
        "protocol": "TCP",
        "port": 53,
        "targetPort": 53
      }
    ],
    "selector": {
      "k8s-app": "kube-dns"
    },
    "clusterIP": "10.96.0.10",
    "type": "ClusterIP",
    "sessionAffinity": "None"
  },
  "status": {
    "loadBalancer": {}
  }
}
So now since we have a running cluster we will create a simple app & deploy it.
The Java App
We will create a simple java app which will return the IP of the machine. we will create a spring boot application.
The Pom file:
<?xml version="1.0" encoding="UTF-8"?>
<project xmlns="http://maven.apache.org/POM/4.0.0" xmlns:xsi="http://www.w3.org/2001/XMLSchema-instance"
         xsi:schemaLocation="http://maven.apache.org/POM/4.0.0 http://maven.apache.org/xsd/maven-4.0.0.xsd">
    <modelVersion>4.0.0</modelVersion>
    <parent>
        <groupId>org.springframework.boot</groupId>
        <artifactId>spring-boot-starter-parent</artifactId>
        <version>2.1.2.RELEASE</version>
        <relativePath/> <!-- lookup parent from repository -->
    </parent>
    <groupId>in.kuros.k8s</groupId>
    <artifactId>machine-ip</artifactId>
    <version>0.0.1</version>
    <name>machine-ip</name>
    <description>Demo project for Spring Boot</description>

    <properties>
        <java.version>1.8</java.version>
    </properties>

    <dependencies>
        <dependency>
            <groupId>org.springframework.boot</groupId>
            <artifactId>spring-boot-starter-web</artifactId>
        </dependency>

        <dependency>
            <groupId>org.springframework.boot</groupId>
            <artifactId>spring-boot-starter-test</artifactId>
            <scope>test</scope>
        </dependency>
    </dependencies>

    <build>
        <plugins>
            <plugin>
                <groupId>org.springframework.boot</groupId>
                <artifactId>spring-boot-maven-plugin</artifactId>
            </plugin>
        </plugins>
    </build>

</project>
We will initialize Spring Boot Application:
import org.springframework.boot.SpringApplication;
import org.springframework.boot.autoconfigure.SpringBootApplication;

@SpringBootApplication
public class MachineIpApplication {

    public static void main(final String[] args) {
        SpringApplication.run(MachineIpApplication.class, args);
    }

}
And are simple rest controller which returns ip of the machine.
import org.springframework.web.bind.annotation.GetMapping;
import org.springframework.web.bind.annotation.RestController;

import java.net.InetAddress;
import java.net.UnknownHostException;

@RestController
public class IpController {

    @GetMapping(path = "/ip")
    public ResponseModel getIp() throws UnknownHostException {
        InetAddress inetAddress = InetAddress.getLocalHost();
        return new ResponseModel(inetAddress.getHostAddress(), inetAddress.getHostName());
    }

    private class ResponseModel {
        private final String ip;
        private final String hostname;

        public ResponseModel(final String ip, final String hostname) {
            this.ip = ip;
            this.hostname = hostname;
        }

        public String getIp() {
            return ip;
        }

        public String getHostname() {
            return hostname;
        }
    }
}
Time to test, run the application after mvn build:
$ mvn install
$ java -jar target/machine-ip-0.0.1.jar
Once the application is up, we will hit exposed rest method and it will return the ip & hostname (something like this)
$ curl localhost:8080/ip
{"ip":"192.168.0.104","hostname":"kuros-MacBook-Pro.local"}
So now we have our sample application ready, time to create docker image.
Dockerfile
We will create a file named as Dockerfile in our home folder.
FROM openjdk:8-jdk-alpine
COPY target/machine-ip-0.0.1.jar app.jar
EXPOSE 8080
ENTRYPOINT ["java","-jar","/app.jar"]
Let’s look at this dockerfile line by line.
- Line 1: we are specifying docker to download openjdk image (tag: 8-jdk-alpine).
- Line 2: copy the generated jar file to docker image with name app.jar
- Line 3: We are exposing 8080 port from the container
- Line 4: finally we are giving command to run the app.jar when container starts.
Building the Docker image
So we have created our dockerfile, now time to build an image.
We will user docker build command. We are provinding a tag (
$  docker build -t incrediblevicky/machine-ip:0.0.1 .

Sending build context to Docker daemon  33.46MB
Step 1/4 : FROM openjdk:8-jdk-alpine
 ---> 792ff45a2a17
Step 2/4 : COPY target/machine-ip-0.0.1.jar app.jar
 ---> Using cache
 ---> 436597bf8464
Step 3/4 : EXPOSE 8080
 ---> Using cache
 ---> 0737665c2f88
Step 4/4 : ENTRYPOINT ["java","-jar","/app.jar"]
 ---> Using cache
 ---> 62ee4df459e4
Successfully built 62ee4df459e4
Successfully tagged incrediblevicky/machine-ip:0.0.1
We can verify the image created:
$ docker images

REPOSITORY            TAG                 IMAGE ID            CREATED             SIZE
incrediblevicky/machine-ip      0.0.1               62ee4df459e4        2 hours ago         122MB
Running Docker image
To run the docker image we will use
docker run -p 8080:8080 -t incrediblevicky/machine-ip:0.0.1
Here, we are mapping 8080 port of host machine to port 8080 of docker container, and running the container by tag name.
And as expected, we can now hit “http://localhost:8080/ip”. But this time hostname and ip has changed. Its the containers ip & hostname.
$ curl localhost:8080/ip

{"ip":"172.17.0.2","hostname":"38abfd9a4016"}
Push the images to docker-hub
First we need to login to docker, just provide your docker id & password when asked, in my case, my username is incrediblevicky
$ docker login

Login with your Docker ID to push and pull images from Docker Hub. If you don't have a Docker ID, head over to https://hub.docker.com to create one.
Username: incrediblevicky
Password:
Login Succeeded
Once, you have successfully logged in we will push the image to docker hub. *use docker push
$ docker push incrediblevicky/machine-ip:0.0.1
Now we are ready with our setup, time for Kubernetes.
Creating Deployment descriptor for Kubernetes
Create a new yaml file. For this exercise we will use Deployment.yaml
apiVersion: apps/v1
kind: Deployment
metadata:
  name: machine-ip
  labels:
    app: machine-ip
spec:
  replicas: 1
  template:
    metadata:
      name: machine-ip
      labels:
        app: machine-ip
    spec:
      containers:
        - name: machine-ip
          image: incrediblevicky/machine-ip:0.0.1
          imagePullPolicy: IfNotPresent
          ports:
            - containerPort: 8080
      restartPolicy: Always
  selector:
    matchLabels:
      app: machine-ip
In this example:
- A Deployment named machine-ip is created, indicated by the .metadata.name field.
- The Deployment creates 1 replicated Pods, indicated by the replicas field.
- The selector field defines how the Deployment finds which Pods to manage. In this case, you simply select a label that is defined in the Pod template (app: machine-ip). However, more sophisticated selection rules are possible, as long as the Pod template itself satisfies the rule.
- The template field contains the following sub-fields:
- The Pods are labeled app: machine-ip using the labels field.
- The Pod template’s specification, or .template.spec field, indicates that the Pods run one container, machine-ip, which runs the incrediblevicky/machine-ip Docker Hub image at version 0.0.1.
- Create one container and name it machine-ip using the name field
- Run the incrediblevicky/machine-ip image at version 0.0.1
- Open port 8080 so that the container can send and accept traffic.
To create this Deployment, run the following command:
$ kubectl create -f Deployment.yaml
Next, run kubectl get deployments. The output is similar to the following:
$ kubectl get deployments

NAME         DESIRED   CURRENT   UP-TO-DATE   AVAILABLE   AGE
machine-ip   1         1         1            1           31s
When you inspect the Deployments in your cluster, the following fields are displayed:
- NAME lists the names of the Deployments in the cluster.
- DESIRED displays the desired number of replicas of the application, which you define when you create the Deployment. This is the desired state.
- CURRENT displays how many replicas are currently running.
- UP-TO-DATE displays the number of replicas that have been updated to achieve the desired state.
- AVAILABLE displays how many replicas of the application are available to your users.
- AGE displays the amount of time that the application has been running.
Running get pods should now show the new Pods:
$ kubectl get pods

NAME                          READY     STATUS    RESTARTS   AGE
machine-ip-5764588bdf-rtmr4   1/1       Running   0          12m
We have successfully deployed our first app to docker, but we still can’t access the url, So we need create service.
Creating Service descriptor for Kubernetes
A Service in Kubernetes is a REST object, similar to a Pod. Like all of the REST objects, a Service definition can be POSTed to the apiserver to create a new instance. For example, suppose you have a set of Pods that each expose port 8080 and carry a label “app=machine-ip”.
Create another yaml file. For this exercise we will use Service.yaml
apiVersion: v1
kind: Service
metadata:
  name: machine-ip-service
spec:
  selector:
    app: machine-ip
  ports:
    - port: 8080
      targetPort: 8080
  type: LoadBalancer
This specification will create a new Service object named “machine-ip-service” which targets TCP port 8080 on any Pod with the “app=machine-ip” label. This Service will also be assigned an IP address (sometimes called the “cluster IP”), which is used by the service proxies. The Service’s selector will be evaluated continuously and the results will be POSTed to an Endpoints object also named “machine-ip-service”.
To create this Deployment, run the following command:
$ kubectl create -f Service.yaml

service "machine-ip-service" created
Run the following command to verify if Service has been created successfully.
$ kubectl get services

NAME                 TYPE           CLUSTER-IP       EXTERNAL-IP   PORT(S)          AGE
kubernetes           ClusterIP      10.96.0.1        <none>        443/TCP          5h
machine-ip-service   LoadBalancer   10.104.164.245   localhost     8080:30420/TCP   5s
Since a machine-ip-service has been created, lets try to access the endpoint:
$ curl localhost:8080/ip

{"ip":"10.1.0.4","hostname":"machine-ip-5764588bdf-rtmr4"}
Congratulations you have you first app deployed on kubernetes
A simple client
Before we move to last section, let create a simple client to make multiple rest calls.
#!/bin/sh

for i in {1..10}
do
   response=$(curl -sb -H "Accept: application/json" "http://localhost:8080/ip")
   echo ${response}
done
When we run this client, we get 10 response, which is from the same machine.
$ ./client.sh

{"ip":"10.1.0.4","hostname":"machine-ip-5764588bdf-rtmr4"}
{"ip":"10.1.0.4","hostname":"machine-ip-5764588bdf-rtmr4"}
{"ip":"10.1.0.4","hostname":"machine-ip-5764588bdf-rtmr4"}
{"ip":"10.1.0.4","hostname":"machine-ip-5764588bdf-rtmr4"}
{"ip":"10.1.0.4","hostname":"machine-ip-5764588bdf-rtmr4"}
{"ip":"10.1.0.4","hostname":"machine-ip-5764588bdf-rtmr4"}
{"ip":"10.1.0.4","hostname":"machine-ip-5764588bdf-rtmr4"}
{"ip":"10.1.0.4","hostname":"machine-ip-5764588bdf-rtmr4"}
{"ip":"10.1.0.4","hostname":"machine-ip-5764588bdf-rtmr4"}
{"ip":"10.1.0.4","hostname":"machine-ip-5764588bdf-rtmr4"}
LoadBalancing with Kubernetes
Currently, we have only one pod running, suddenly the traffic has increased tremendously and we need to scale our app, what to do …
Simply increase the replica set & let kubernetes handle the complexity.
$ kubectl scale --replicas=5 deployment/machine-ip

deployment.extensions "machine-ip" scaled
Now, lets check the available pods:
$ kubectl get pods

NAME                          READY     STATUS    RESTARTS   AGE
machine-ip-5764588bdf-2sfxs   1/1       Running   0          13s
machine-ip-5764588bdf-5g9wc   1/1       Running   0          13s
machine-ip-5764588bdf-fh4v5   1/1       Running   0          13s
machine-ip-5764588bdf-nh4mh   1/1       Running   0          13s
machine-ip-5764588bdf-rtmr4   1/1       Running   0          1h
We see 4 new pods have been created instantly. Lets see what happens when make multiple client requests
$ ./client.sh

{"ip":"10.1.0.8","hostname":"machine-ip-5764588bdf-2sfxs"}
{"ip":"10.1.0.5","hostname":"machine-ip-5764588bdf-5g9wc"}
{"ip":"10.1.0.4","hostname":"machine-ip-5764588bdf-rtmr4"}
{"ip":"10.1.0.6","hostname":"machine-ip-5764588bdf-fh4v5"}
{"ip":"10.1.0.6","hostname":"machine-ip-5764588bdf-fh4v5"}
{"ip":"10.1.0.5","hostname":"machine-ip-5764588bdf-5g9wc"}
{"ip":"10.1.0.7","hostname":"machine-ip-5764588bdf-nh4mh"}
{"ip":"10.1.0.4","hostname":"machine-ip-5764588bdf-rtmr4"}
{"ip":"10.1.0.5","hostname":"machine-ip-5764588bdf-5g9wc"}
{"ip":"10.1.0.6","hostname":"machine-ip-5764588bdf-fh4v5"}
If you observe, the requests are catered through different containers.
Similarly we can scale down, test the endpoint again
$ kubectl scale --replicas=2 deployment/machine-ip

deployment.extensions "machine-ip" scaled

$ kubectl get pods

NAME                          READY     STATUS        RESTARTS   AGE
machine-ip-5764588bdf-fh4v5   0/1       Terminating   0          7m
machine-ip-5764588bdf-nh4mh   1/1       Running       0          7m
machine-ip-5764588bdf-rtmr4   1/1       Running       0          1h


$ ./client.sh

{"ip":"10.1.0.7","hostname":"machine-ip-5764588bdf-nh4mh"}
{"ip":"10.1.0.4","hostname":"machine-ip-5764588bdf-rtmr4"}
{"ip":"10.1.0.4","hostname":"machine-ip-5764588bdf-rtmr4"}
{"ip":"10.1.0.7","hostname":"machine-ip-5764588bdf-nh4mh"}
{"ip":"10.1.0.7","hostname":"machine-ip-5764588bdf-nh4mh"}
{"ip":"10.1.0.7","hostname":"machine-ip-5764588bdf-nh4mh"}
{"ip":"10.1.0.7","hostname":"machine-ip-5764588bdf-nh4mh"}
{"ip":"10.1.0.7","hostname":"machine-ip-5764588bdf-nh4mh"}
{"ip":"10.1.0.4","hostname":"machine-ip-5764588bdf-rtmr4"}
{"ip":"10.1.0.4","hostname":"machine-ip-5764588bdf-rtmr4"}
We successfully scaled down our application.
Conclusion
In this article we installed docker with kubernetes, created a docker image of a java app, pushed it to docker-hub. Then we created our Kubernetes deployment & services, and started our first pod. We also looked at how kubernetes handles scaling effortlessly.
You can find the complete code on github
If you liked this article, you can buy me a coffee
Leave a comment